
After many years of wanting a good running GS-4 I finally have one. I have had to put up with Bachmann GS-4s for over 20 years until now. Bachmann shells have superb detail but their mechanical side leaves a lot to be desired.
The early Bachmanns were terrible, I sold four of them on E-Bay for parts leaving me with 4 Plus Series. The Plus Series are a bit better, the motor in a plus is very good. The driver wheels are only slightly better than the old version. I have replaced the driver wheels at least once in each one. I finally sent one of my Plus Series Daylights to Bachmann to repair and they returned a Spectrum Series which has been very good so far, they charged me $35 for the repair which I think is a real bargain for what I received.
I have regressed, back to my subject of my newest GS-4 War Baby.
Recently I bought two Bowser Mechanisms for Bachmann 4-8-4s on E-Bay and they're Great.
This post is about the construction of one of the kits, it converts a Bachmann 4-8-4 to a reliable great running locomotive using a Bowser Mechanism. This particular Kit is actually a Bowser Mechanism #205 for a Bachmann Niagara not a #204 for the GS-4, however it is easily adapted to the Southern Pacific version GS-4.
This project took a bit of adlibbing to adapt the older Bowser Kit (late 60s) with a newer Bachmann locomotive (late 90s) but that's what Model Railroading is all about.
I got carried away and didn't take any pictures of the Kit before I started putting it together so the insert below is from the Bowser instructions showing a parts blowup of the frame with part numbers.

As you can see the Bower instructions are very good. I e-mailed Bowser about parts availability and they still have every thing in stock but the driver wheels. I placed an order through needtrains.com and Terry got me some spare parts. The wheels are tapped for 0-80 screws which are pretty common so I put some of the screws on the order. Bowser also has the Pittman DC-70/71 brush holder insulators in stock (#22206) that isolate the motor from the frame so I ordered several for my older MDC locomotives also.
The picture below is the Bowser frame and driver wheels assembled and running.

The Bowser frame needed a bit of work removing the casting spru. It is very basic, top and bottom frame with four driver wheels held together with 2-56 screws.
I missed one important piece of information in the Bowser instructions, it said "Do not run upside down". The reason is that the valve gear will drop down and bind the driver wheels. If I had permanently mounted everything it would have broken the Bachmann cylinder assembly. "If all else fails, follow the instructions".
 The picture above shows the Bachmann shell with an added 8 ounces of lead weight. The half pound Lee weight has been cut in half for even weight distribution, 4 ounces above the first driver and 4 ounces over the rear driver. I glued the weights in place with GOOP, my favorite glue. With the added weight the new engine weighs the same as the original Bachmann GS-4.
The newer Bachmann parts don't fit the older Bowser Kit so I made my own adapter parts. It required a ½" x 12" x .032" brass strip. I measured the distance between the Bowser frame to the rear mount on the shell as well as from the front of the frame to the mounting bracket behind the pilot. I used a short piece of 3/16" brass tubing as a stand off between the brass frame extension and the shell. A 2-56 screw goes through the frame/tubing to the shell to hold it in place.

The picture above shows the Bachmann Spectrum rear truck in place.
The picture below shows the DC-71 motor in place, the DC-71 motor is very powerful and has low current drain.

I cut the wires and soldered a two pin Polarized connector to them so that the frame can be easily removed for maintenance.

 The picture above shows the Bachmann Cylinder assembly installed and the picture below shows the brass strip frame extension and pilot wheel mounting.
 The picture below shows the wiring going to the various lights with resistors and diodes for the LEDs.
 The marker lights are 1mm 1½ volt micro lamps and they require a voltage dropping device so I used one of my regulators. The regulator supplies 1¼ volts for the micro lamps as well as 5 volts for the number board LEDs.
  The regulator fit perfectly between the rear weight and firebox on the shell, I used Goop to glue it to the firebox.
  I illuminated the marker lights myself by drilling out the existing Bachmann dummy's with a 1.5mm drill using the bit in a pin vice.
 I also drilled three 3/32" holes in the number boards then elongated them with my X-Acto knife. When the rectangular hole was the correct size I made a white styrene cover plate to glue the engine number to. The white .02" styrene worked great as a defuser for the LEDs.
 The number boards look good even without the LEDs on.
 The front looks real good with the lights on.
 The number boards look great with the LEDs on too.
 I just love lighting up my HO trains and accessories.
 This shows the DCC connector mounted below the cab out of sight.
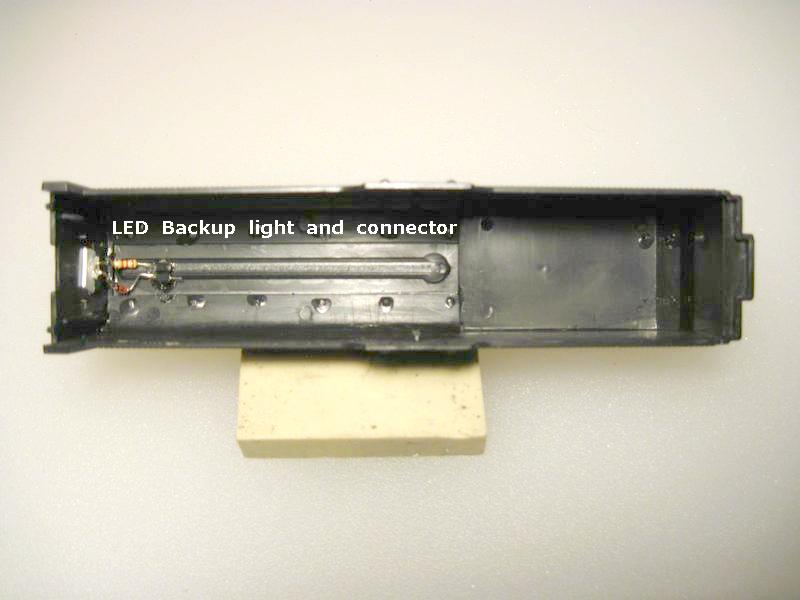 I also love my Alps Printer because I can make my own decals on the fly as needed. I printed the 4430 decals on my Alps.
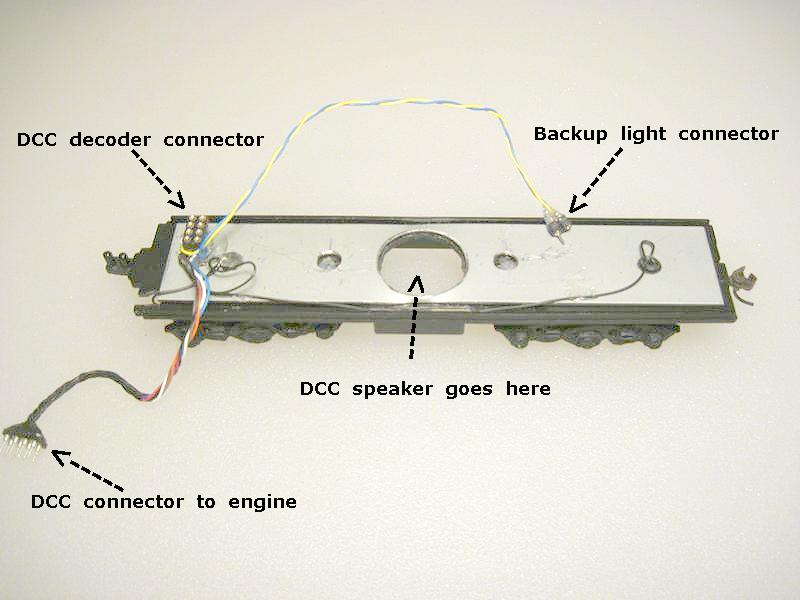 The pictures above and below show the mods to the Bachmann Tender for lighting and DCC decoder.
In case you can't tell this tender will get a Digitrax SDH164 decoder with sound, the big hole is for the speaker. I installed the decoder the tender and checked it out, everything works very good as planed.

I had to work at programming the decoder, I had problems getting the decoder to except some of the changes. The problem was CV29 needed to be set for both 2 & 4 digit addressing plus analog mode.

The engine is finished and the decoder works Great!
The Video below is my Bowser Mechanism running
Click on the button to watch my 15 second video
As I stated above I now have a good running GS-4 that the wheels won't fall off. These Bowser parts are made in the good old USA. Too bad that Bachmann didn't put some research into their plastic axle insulators. That is a major problem with all locomotives manufactured in China . . . . the plastic cracks and the wheels either fall off or slip on the axles.
I will add a video of my new treasure running on my layout after I get it cleaned up and back in operation, I've been working on the wiring interface to my Control Panel. Cutting over to DCC from an older DC block operation can be very time consuming.