

This shows a portion of the roof with shingles glued to the second floor wall/roof sides. I wouldn't have followed the instructions had there been any on applying the shingles. The strip shingles are very common in craftsman kits so I've had a lot of experience using them. First do not use a sponge and water! that will surely warp the card stock roof. Again I used Aleene's wood glue sparingly. It is very important to use a stainable glue if you are planning to stain the shingles, otherwise it will look like crap if you try to stain it.

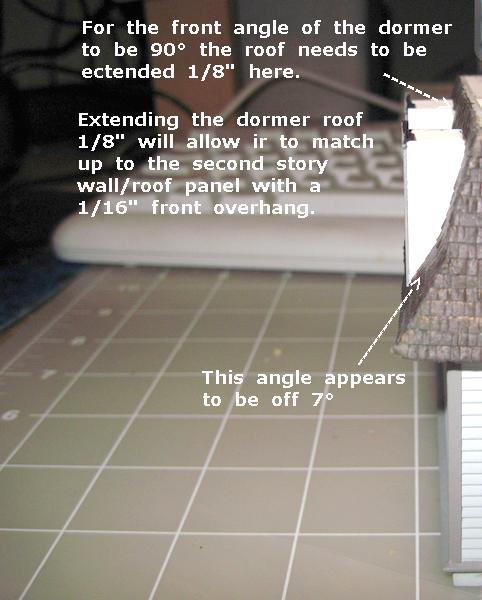
As I mentioned earlier there is a problem with the dormers. The printed dormer roof on the card stock is too short to reach the second floor roof. The sketch below is the only information in the instructions to complete the dormers. The printed material for the dormer walls also don't match the angle of second floor roof. The angle of the second story wall panel is off by 7° therefore the dormer roof lacks 1/16" in length. The dormer roof lacks a overhang on the front also. To make everything fit it was necessary to cut a new 1/8" longer roof section for the dormers.

I don't know what the problem is for sure, I suspect that the draftsman/design engineer missed the angle on the printed card stock. Extending the dormer roof was the easiest fix.

These pictures show that the dormer is to short.


The longer roof fit perfectly.


As you can see the extended roof on the dormer looks good. I'm waiting to finish the dormer roofs, my wife is making the curtains for the windows then I will attach them to the window glass and glue them in place..

The instructions said to proceed to the front porch and this is it. The kit would left the roof section of the porch hollow but as I'm going to illuminate it I filled the roof with a ¼" piece of balsa for added strength. The Grandt Line details are very nice and authentic for the period.

The Instructions were inadequate here also. The basswood angle trim left a gap between the porch roof and deck so that required some trimming to fit flush.
The shingles and porch deck are stained with Folk Art #2804 Walnut.

After the trimming to fit I glued the porch in place and added my son and his friend.
On to the juicy stuff, my son was quite the prankster so I added some special effects to the second floor as can be seen in the pictures below.


After the curtains are added and with the room light on you should see a silhouette in the window.


I bought some Window Dressing Curtains from City Classics. There are enough curtains on a sheet of clear plastic to do 54 windows.

 The window sheet is clear, I put a piece of black card stock under the sheet to take the picture.
 The curtains are printed on the back of the clear plastic sheet so they appear as window glass from the front. They are very nice, as you can see in the bottom window there is a person standing behind the window.
 I highly recommend the City Classic Window Dressings because they make curtains extremely easy to do and they also look very good.
Well my son's home is finally finished and on my layout. All eleven lights work and are individually controlled from my control panel. I'm working on finishing up the scenery around his house and Diner.

