
After finding an old video of a Cab Forward pulling a string of Heavy Weight Pullmans out of Bakersfield (I think it was the Lark) in the middle 40s I decided to add some HW passenger cars to my fleet.
Bakersfield to Saugus Cab Forward video
I began by attending the Annual Kern County Train Show in early March. I picked up five used Athearn Heavy Weight cars for $5 each, should have bought more. 😢
There wasn't a HW baggage car at a reasonable price so I went to the old standby, eBay. I picked up a baggage car and a coach for $8.
I stripped everything down to the bare shell in preparation to be painted. Four of the cars had Walthers diaphragms so I decided to try them on my layout. My smallest mainline radius is 26" so I'm hoping they will be OK. I had two pairs of Walthers and ordered another four pair.
I also picked up a second HW baggage car (IHC) off eBay, I plan on doing a kitbash with it. The SP had several shorty baggage cars so the IHC will become a shorty.
All eight cars are in excellent condition.
This is where I'm at (March 18).


I have completed the Athearn Baggage car, I installed the electronics to power the LED lighting for all of the HW cars. I'm going to use the end doors for the wires between cars, they will be hidden by the diaphragms.
This is the finished electronics.


The TP4056 comes with a USB connector mounted between the two 2mm screws on the left (power in), I removed the USB connector and used the solder tabs under the screws for the connections for the 5 volts power in and the 4 volts out to the battery on the right (Battery out). I went with 2mm solder tabs instead of soldering to the board.

I used the Athearn HW trucks with home made wiper contacts (Kadee coupler springs) and some superflex #30 wire for power pickup. I installed Athearn metal wheels, all twelve wheels pickup rail power.
The power is routed to a 1½ amp bridge rectifier then to a LM7805 5 volt regulator. The 5 volts from the regulator feeds the TP4056 charger and the charger goes directly to the battery.
I glued a magnetic latching read switch to the underside of the roof to turn on and off the 4 volt passenger lighting when running in DC mode. A simple wave of a small magnet above the baggage car roof will operate the reed switch.
If everything works out as planned I will add a Digitrax FL1 single function DCC decoder later to control the lighting when running in DCC mode.
I was worried about a problem should a car derail and cause a short in the power wiring. The LED power distribution is less than 50ma but with a 1000ma battery a short could do some serious damage. I found some resetable fuses made by Littlefuse rated at 50ma so I installed a micro connector to hold the fuse.

My Daylight streamline passenger cars draw a bit over 60ma so I bought some 100ma fuses for their power unit. The Daylight power unit has a 5000ma battery so it's safe too with the 100ma fuse.
While waiting for my LHS to get me the SP Lark/Owl colors I have continued with the interior lighting of the observation car.
Here is a typical HW Observation/Business car floor plan.


The view from below the car shows the two LEDs for the vestibule.
The SMT 1206 Red LED is very bright and it is only drawing .5ma, I might have to drop the current more to lower the brightness.
I added some figures standing on the Vestibule.

I drilled .02" (#76) hole in the bottom of the figures and super glued a short piece of .02" Phosphor Bronze rod as a support. I drilled several .021 (#75) holes in the floor of the Vestibule to position the figures. The rod fits tight enough in the floor that the figures don't swivel around.
---------------------

I made the curved seat from individual seats from my earlier castings. I made a mold of it for future use.
I've finished the interior and it's ready for occupancy. I decided to come up with some table lamps for those that would like to read while riding the rails.

I made a couple of table lamps from 5mm warm white LEDs, the tables are Athearn Streamline windows and painted dark brown. I made the table legs from the LED pins and they plug into a micro connector mounted in the floor of the car.

They look pretty good without ambient lighting.
I have experimented making lamps using LEDs and they look pretty good. I picked up some 3mm plastic beads at Hobby Lobby to use for the table lamp bases. That was a real improvement over my hand made bases. While I was in the experimental mode I tried my hand making some floor lamps too. This is a picture of a few of my lamps.


The table lamp (LED) on the right has a 4.7KΩ resistor in series, at 4 volts it draws 300ųa.
Here is the IHC Baggage car being Kitbashed.

I chopped the car at the center of the dual door so that one door can be removed.

I took cut a second section out of the center to shorten the overall length of the car.

This is my kitbash with SP Lark colors ready for finishing.

Things are coming along pretty good, this is my heavy weight fleet ready to decal.

I finished my first Heavy Weight, the Athearn 70' baggage car.

It turned out pretty good. It's finished and ready to go. The electronic and lighting work as designed and I used .040" clear Styrene sheet for the windows. The Styrene looks better than the Athearn windows, no light reflection on the bottom sill like in the Athearn windows.
I started making castings for the interiors, I made 8 seat seat castings. There are seven chairs on each side of the castings and the day coaches need 16 chair seats on each side.

I'll tackle the bed/seats for the sleepers next.
The flowing pictures are of my lighting procedure for all of my Heavy Weight cars.


The picture above shows using number 8 bird shot for weight. The depressed area in the center of the car frame holds two ounces of bird shot, the same weight as the Athearn metal weights. By using the bird shot for weight I gained ¼" of usable space lowering the interior so that I don't have to cut off the legs of the passenger and SP staff figures to keep them in proper proportion.


I drilled two holes in the frame to hold the male connector then with the female connector plugged into the male and a dob of super glue gel on the female I set the shell in place to fix the correct position of the female connector so that it mates correctly to the male.

The jumpers won't be seen passing through the diaphragms.

When I'm working on my painted cars and locomotives I use a hand towel to prevent scuffing the paint.
I'm sorta jumping around on this project. This is a coach with the seats installed and painted Lark Light Grey. Next step on this car will be painting the carpets.

Progress is slowly coming around, I'm currently working on the interior of the diner.
 I ordered some restaurant chairs from Shapeways for the diner.

I tweaked the car LED lighting to balance the eating area and slightly brighter in the kitchen. By using wide angle warm white LEDs is was able to keep the LED current very low with realistic looking light.

I've changed the wiring of my coaches to make the lighting adjustable. I changed the series resistor to each LED from 4.7KΩ to 330Ω and added a 2KΩ 25 turn potentiometer in series to the paralleled LEDs. I mounted the pot in the open door on the forward end of the car. The diaphragms will hide the pot from view.

The current is adjustable from 500 microamps to 29 milliamps for total LED current from the 4 volt source in the baggage power car. The coach looks good at 2ma with the unpainted interior and the diner looks good at 3ma.

933-429 Diaphragms.
Seat Modification:
I bought some IHC coach interiors many years ago and made molds of them to make my own interiors. The seat spacing isn't correct for my Athearn Heavy weight coaches. I cut up two of my castings to correct the spacing so that each seat matched the window spacing of the Athearn coaches. The original IHC seat configuration was made up of two sections of 14 seats, 7 on each side. I stayed with 14 seat sections for my new mold with the correct spacing.

The picture above is the new mold with the correct spacing and a casting ready to install in a Heavy Weight coach.
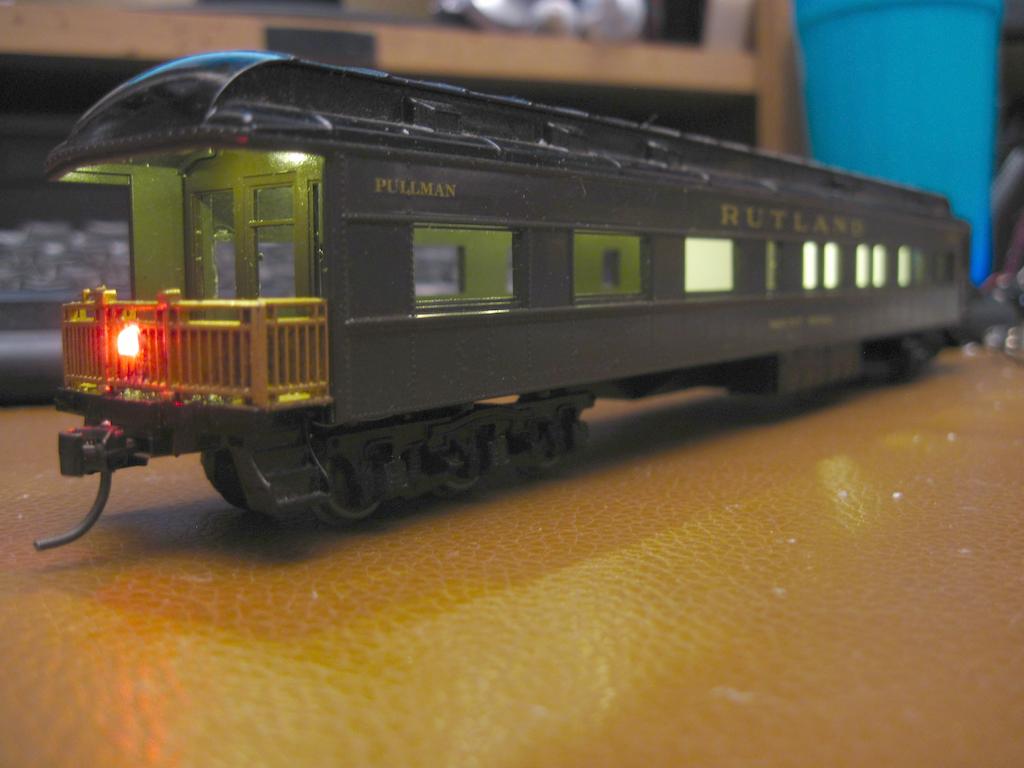
I have finished the Observation car. I have all the lights working the way I want and I populated it with hand painted passengers.

The painting went better than expected. I used flat Crafters Acrylic paint, it took about three hours to paint the 20 figures.


The three ladies on the rear platform are prepainted Preiser figures.


1

With the success of my Observation car interior I decided to tackle my Diner.


More to follow soon
No comments:
Post a Comment