
This is my second kit-bash Bachmann Full Dome Car to a SP ¾ Dome/Lounge car.
I first published this post on May 9th. and have been adding to it as work progresses on this project. The car is finally finished and it came out very nice.
I had a hard time finding good pictures to work from, after I finished my first ¾ dome car I found several very good pictures of the original cars. Now I want to correct several errors but I don't want to redo the first one so I put in several token bids on E-Bay and got another full dome car to kit-bash.
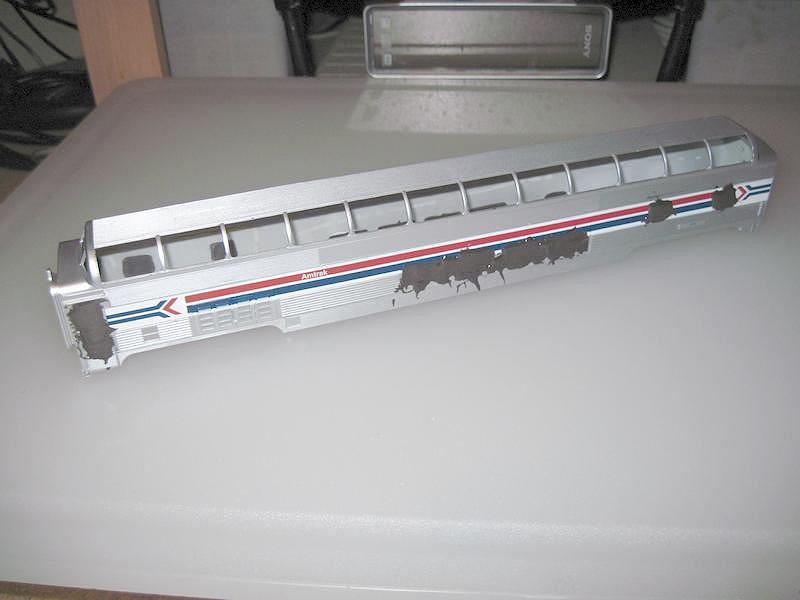
This one is an Amtrak version and I will take more pictures of the process than I did on the first car.
↓ This is the type of car that I will be starting with ↓

The first thing I will do after disassembling it will be to sand the sides because all of the SP Dome Cars were smooth sided. Then I will fill in the lower windows and the doors with J-B KWIK Epoxy.
I have decided to start on the interior first mainly because this car is a newer version and is quite different from the older one that I did the first time.
Bachmann made many changes in their new version. The trucks have metal frames now with good power pickup, that's a positive. Their interior lighting is a waste of light bulbs! In total darkness one can barely tell it is illuminated mainly because of the darkened windows, the darkened windows are a negative. The interior upper level is the same as the old version, that's a positive. They reversed the coupler mechanisms and now they are plastic, that's a negative. The shells plastic is much thinner than the old version, that will require a lot patience sanding the sides for the SP Smooth Side Prototype. That's also very negative.
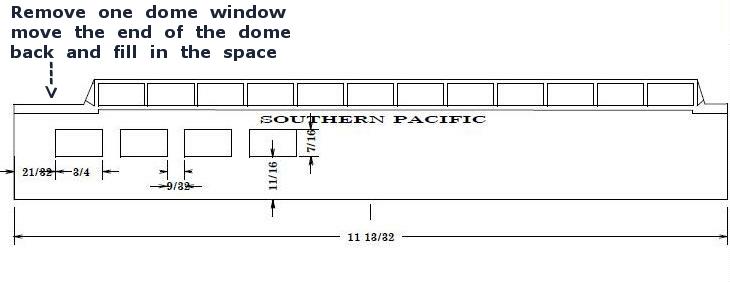
I made a quick actual size CAD drawing with the lounge windows in their proper place.

I will use the drawing as a template to cut in the new windows.
The picture below is what the kit-bash project should look like when finished.

My finished project will be painted in SP Daylight colors
This is the actual Bachmann shell that I'm starting with.

This is what the upper deck looked like before I cut it up.

This is the new upper deck, I will paint the floor black and leave the seats as is.

I found a floor plan for car 3601 in PDF format, the resolution was so bad I decided to redraw it on my CAD. Most of the measurements were unreadable.
 My drawing above is close to the original car, two other PDFs shows some changes made in the 1960s. I chose to use the original floor plan.
The picture below shows the lounge seats glued in place after I removed the flooring from them.

I used a ¼" x ⅛" piece of styrene to glue the two sectionals together and used a second piece for the correct spacing from the car floor. The open space to the right will be car's the Snack/Bar.

The side seats are glued to the coupler mechanism arm, the seat assembly moves back and fourth ⅜". That was necessary to reduce the height of the seats. I used my Dremel tool to notch out a space under one of the chairs for the coupler mechanism joint. The sectional is supported with a ¼" x ⅛" piece of styrene from the car floor.
My 1:100 sale figures arrived so my ¾ Dome car kitbash is back in business.
I started by filling in all of the side windows and doors with J-B KWIK Epoxy. The SP ¾ dome windows are in the lounge area, 3 on one side and 4 on the other. The prototype doesn't have side doors either.

I used a ¾" x .032" piece of brass strip as a backing to support the epoxy until it setup. I put a light coat of white grease on the brass so that the epoxy wouldn't adhere to it.

I will have to be very careful sanding the sides, the Bachmann shell is super thin. The Prototype sides are smooth.

Next I glued the figures in to their seats, there are 45 figures on the top deck.

There was a slot in the center of the top deck floor, I glued a ½" wide by .02" strip of styrene under the floor to fill the slot. Then I painted the entire floor black.

Next came the figures in the lounge, I glued 25 passengers to the chairs in the lounge. I have 4 passengers standing in the lounge, one entering the lounge from an adjoining car and the SP employee behind the counter.

The box looking thing in the right corner is the lounge Snack/Bar, it's made from .020" styrene sheet. I painted it chocolate, the prototype is Mahogany. The lounge interior walls will be Camel. I didn't see anything about why the dome was moved back. When I was building the interior it dawned on me that dome was moved back because of the addition of the drink and food storage in the lounge Snack/Bar area.

I like my settings to be busy, that takes the eye away from errors.

The Snack/Bar walls are notched to give the coupler mechanism room to move freely. So far so good. The slightly smaller 1:100 scale passengers are not noticeable and they fit in the small Bachmann chairs nicely, conventional 1:87 HO scale figures are a bit too large to fit two in a chair.

My next task is sanding the shell walls smooth like the prototype.
The next pictures are of the shell after I used a sanding block with 100 grit sand paper.


I switched to 150 grit for the finish work. The car is going to look funny without any side detail but that is how the prototypes were built, with smooth sides.
The pictures below were taken after I cutout one of dome window sections and moved the end of the dome back like the SP prototype.

The broken window frame happened during the strip down of the windows. I will use the dome frame section that I removed to replace it.
I will glue in some styrene glue blocks to support the new roof section.

I added the bracing for the new roof and let it dry over night.

This shows the first .02" styrene section in place with rubber bands waiting for the glue to dry.
The next 3 pictures show the new two ply roof section in place with the white modeling putty work finished and ready for primer.


At this point the progress will come to a very slow pace. After the primer is applied it will have to dry for several hours between coats before sanding can be done.
I finished cutting in the lounge windows and repaired the broken window frame on this side.
 This side is finished and ready for paint, it has been sanded between of 4 coats of Testors white primer and then the final sanding was done with wet 400 grit sandpaper.
It was hard to get started again after not working on this car for several weeks. We had family from out of state visit so my railroad was put aside. It didn't help any that my stopping point was at a critical point also.
I had finished the Fireman's side of the car when I stopped. When I started back the task was to cut in the four windows on the Engineer's side. It went so well that I forgot to take pictures before I applied the flat black.

This is where I started back to work on the car. I cut in the four windows and applied three coats of Testors White Primer sanding between each coat with 150 grit and finishing up with 400 grit wet.

This is the Fireman's side of the car ready for paint. The Bakersfield heat is on so after I applied the flat black paint I put the car out on my patio in the 106° sun for two hours to give it a baked on finish.
I will let the flat black cure for several days before I get out the masking tape to prepare for the SP Scarlet Red sides.
I painted the top and bottom first with Testors Flat Black Spray Paint. After letting the black dry for 48 hours I masked the top and bottom and applied the Floquil SP Scarlet Red with my air brush.

These two pictures show the car after being sealed with Krylon Clear Matte.

The pictures below have the decals added and a top coat of Testors Dull Coat.

I used leftover Micro Scale decals from an E-7 decal set for the orange band and the Shasta Daylight logos. I made the Southern Pacific and car numbers on my Alps printer.


Here the dome windows have been reinstalled.


Finished modified Lounge end of the car.
I'm working on the car lighting now, installing 1½ volt GOW lamps and the voltage regulator.

I installed a sub-miniature DPDT switch in a piece of scrap acrylic between the top deck and the car bottom frame.
 The operating lever of the switch will stick through the car door window flush with the diaphragm. It can be easily operated without being seen, I darkened the lever with a black Sharpie.
 The switch in the up position will turn on the interior lights and charge the on board NIMH AA battery from the rails. The Center position will be off and the down position will apply the rail power only to the charging circuit leaving the lights off.
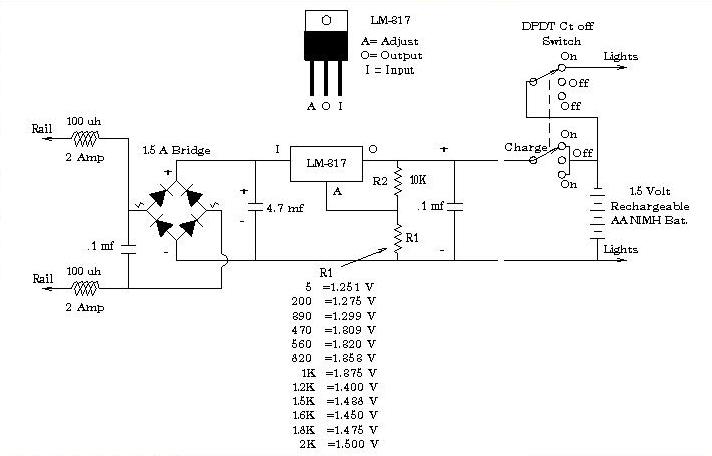
This is the circuit that I'm going to use on all of my on board 1½ volt lighting. By selecting the proper resistor for R1 the voltage can be adjusted to any voltage between 1.25 and 1.50 volts. The batteries and manufacturers current and voltage varies so I adjust the value of R1 for the battery I'm using for compatibility.

The drawing above is the physical layout of the regulator parts.
For all of my 1½ volt lightning that doesn't use a battery backup I use a 1.2K ¼ watt resistor to set the voltage at 1.40 volts. The slightly lower voltage will add many hours of life to the miniature lamps as well as add to the realism.
The regulator circuit above is rated at 1.5 Amps with a good heat-sink. I Super Glue the chip and bridge rectifier to the car ballast weight to help dissipate the heat. I use three types of 1½ volt miniature lamps, 1mm GOS @ 15ma., 2mm GOR @ 20ma. & 3mm GOW @ 100ma. I use the 1mm primarily for marker lamps, 2mm for dim coach lightning & 3mm for bright lightning.
Needless to say more than 3 of the 3mm 100ma lamps will really heat up the regulator and the inside of an illuminated car.
The following pictures are of the lightning system power supply.

The ML-317T regulator and the 1½ amp bridge rectifier are Super Glued to the metal car weight to dissipate heat from the power supply.
 The DPDT Center Off switch controls the power to the overhead lights and the on-board rechargeable AA NIMH battery. The switch handle sticks out the walk through door window.
 In the up position the lights are on and the battery is charging. The center position is off, in the down position only the battery is being charged.


The lights arrived and I have installed them. They are 1½ volt 2mm lamps. I have them operating on 1.31 volts and they have just the right illumination for the car interior.

With the large lounge windows the smaller 1:100 passengers looked too small. Starting with the picture above the the next few pictures show the lounge with 1:87 passengers.

The standard 1:87 HO figures look much better.

They have better detail and after I gave them custom colors they look more realistic than the smaller ones.

There is also a better selection of figure poses.

The next set of pictures were taken with the lighting on but it's hard to detect with the flash on.

The pictures above and below are close ups of the finished lounge section.


The pictures above and below show the finished ¾ Dome Car.

This has been a very long project but worth all of the hard work.
The next 7 pictures were taken with out flash and with low level lighting so that the car interior lighting effect can be seen.
The next 7 pictures were taken with out flash and with low level lighting so that the car interior lighting effect can be seen.


