
I decided to Kitbash a Rivarossi AC-10 Cab Forward to an AC-9. The SP essentially did that same thing, they had Lima Locomotive Works build twelve AC-9s from the Baldwin Cab Forward Specifications. The Cab Forward is a 2-8-8-4 Yellowstone class locomotive running in reverse. The AC-9 specifications are identical to the AC-10s with the exception of the cab and fuel feed system. All mechanical specs are the same on both.
The Southern Pacific had the twelve AC-9s built specifically for the El Paso to Tucumcari Route. Because there were no tunnels on that route the Cab Forward type locomotive was not needed.
Some of the pictures in this post are of my fourth Kitbash AC-9 that I'm working on now but the process is the same as the first one. Number 3805 was my second conversion. I was recently given another Cab Forward and I'm in the process of making my fourth AC-9.
My first Kitbash AC-9 project started with a Rivarossi AC-10 Cab Forward number 4272 purchased off E-Bay for around $50.

Next I removed the cab roof and cut the domes off the top of the boiler.

I purchased several GS-4 4-8-4 War Baby shells direct from Bachmann for $12 to obtain their Skyline, Pilot and Cab parts. The Southern Pacific GS-4s were also built by Lima and they have the same style Skyline and Pilot as the AC-9s.

Next I laid out the GS-4 shells for my cuts to get the parts needed for the AC-9 Skyline.


Some modifications need to be done to the GS-4 Skyline.

Next is laying out the Skyline parts and shaping them for gluing.


In this picture the new Skyline is in place on the Cab Froward boiler and ready for gluing. It's beginning to take shape.
Next is to convert and extend the Cab Forward cab forming the new conventional rear cab for AC-9.


Next save the GS-4 Number Plates from Shell #2.

The Number Plates will mount next to the AC-9 exhaust stacks. The AC-9 Number Plates are the same as the ones used on the Lima built GS-4s.
Later on I decided to redo the Number Plates from scrap acrylic so that I could illuminate them. I swapped out the old number boards with the illuminated ones several years later.
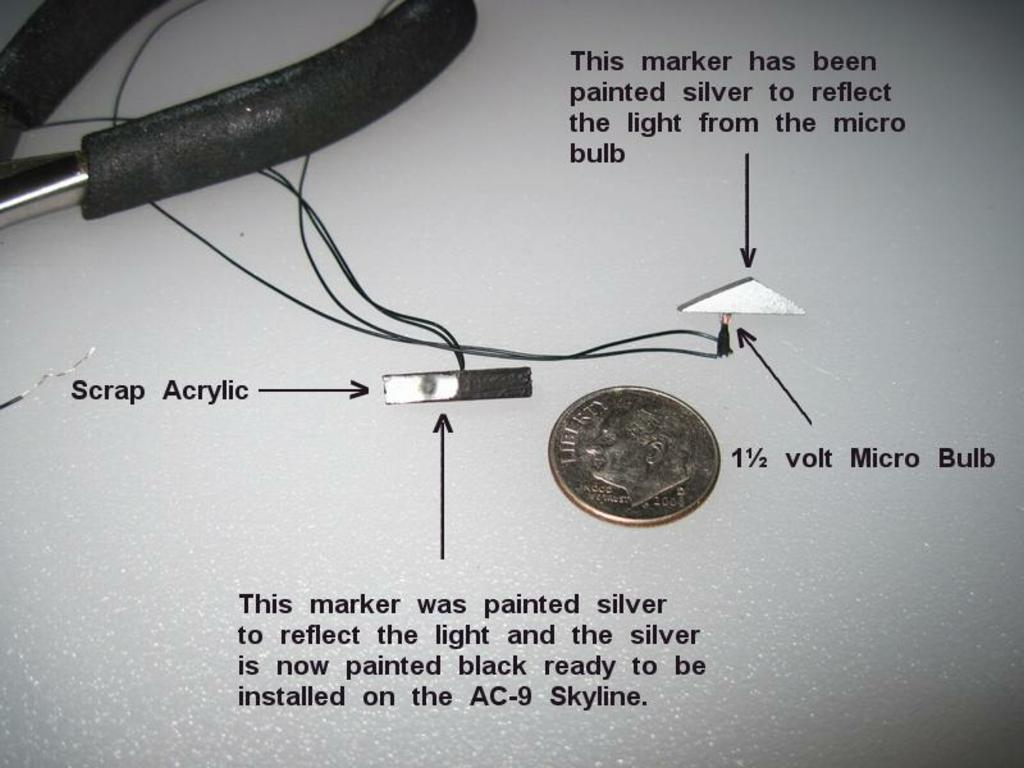 I cut two triangle shaped pieces of scrap acrylic and polished the edges. Then I drilled a 2mm hole in the Skyline side for the micro-bulb. To help contain the light I painted them silver first then black leaving the number window clear. They are ready to install on the Skyline.

These two pictures show my home brew Illuminated Number Plates.

The next picture was taken with no light and the Number Board illuminated.

Back to the original Kitbash:
The boiler is finished, I have added the detail parts and given it a final Dull Coat.
 The hand rail is new stock, .020" music wire. The whistle is painted brass and installed. The air horn is also painted and in place. Both the whistle and horn are Mel castings made with JW KWIK Epoxy.

 The boiler is setting on top of the original Cab Forward lower bottom shell.
 I added some detail that wasn't on the original Cab Forward. The throttle rod and bell crank were raised plastic cast on the boiler. I added the .020" music wire and brass crank.

 The air compressors and tank are AC-9 Lost Wax Castings from Precision Scale.

The next two pictures are of the finished boiler.
 The window glass is in place.
 The Engineer and Fireman are ready to take it on a test run.

I will install the handrails when I put the boiler shell on the running chassis.


This is my first AC-9 conversion #3807

I now have three SP AC-9s with new Neodymium magnet motors, working marker lights, illuminated number boards, LED headlight & tender backup light and DCC decoders with sound.
My fourth conversion #3800 will have 2 Canon EN-22 motors, #3805 has a Faulhaber SR2224 motor and #3807 & #3911 have a single Canon EN-22.
Later on I decided to redo the Number Plates from scrap acrylic so that I could illuminate them. I swapped out the old number boards with the illuminated ones several years later.
These two pictures show my home brew Illuminated Number Plates.
The next picture was taken with no light and the Number Board illuminated.
Back to the original Kitbash:
The boiler is finished, I have added the detail parts and given it a final Dull Coat.
The next two pictures are of the finished boiler.
Next came the Precision Scale #31554 trailing trucks.
The next three pictures show #3805 finished and operational complete with a Faulhaber motor and a DCC decoder with sound.
This is my first AC-9 conversion #3807
I now have three SP AC-9s with new Neodymium magnet motors, working marker lights, illuminated number boards, LED headlight & tender backup light and DCC decoders with sound.
My fourth conversion #3800 will have 2 Canon EN-22 motors, #3805 has a Faulhaber SR2224 motor and #3807 & #3911 have a single Canon EN-22.