.

Welcome to My HO Model Railroad Blog

September 12 Doug's New House Part 2

Part 2 continues with the construction of the second floor of my sons house.

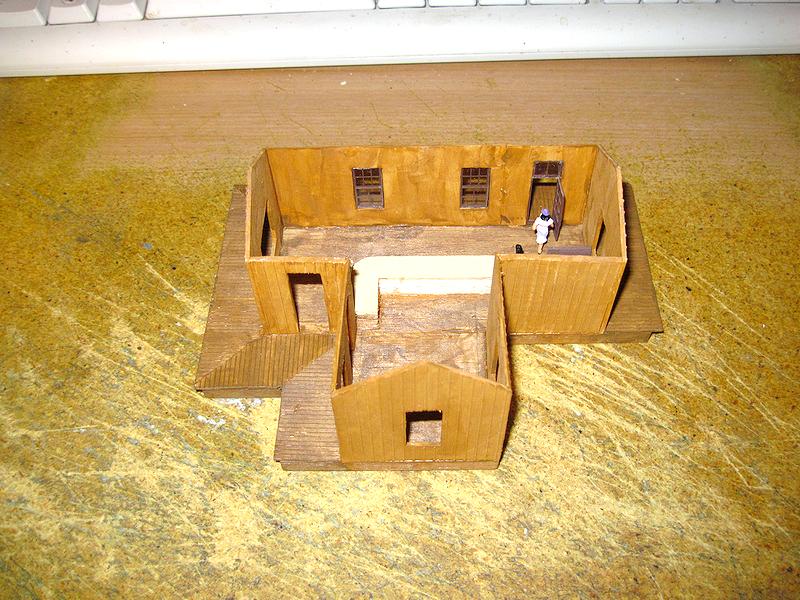
I slipped up again and didn't take pictures of early second floor roof/walls before I added the room dividers. 

As you can see everything is well marked for error free assembly after cutting out the sections.  

This is a good time to talk about something for the workbench.  I have been building hobby type things for 63 years and specifically model railroad stuff for 60 of them. I had never heard of or had any knowledge of a Self Healing Cutting Matt until half way through this project when my friend Dan Merkel told my that I needed one.  

I told him that I broke 5 #11 X-Acto blades cutting the cardboard pieces for this project.

I had my wife pick me one up at Office Depot and I can't express how much I needed it 60 years ago.  I have literately demolished every workbench that I've had over the years not having a cutting mat.  I've had many cutting boards that were just a piece of wood but I've always broken blades like they were going out of style.  I have payed the price of the cutting mat dozens of times buying blades.  Since I have been using the mat I haven't broken a blade or put a slice in my workbench.  Even better yet, cutting is so much easier that it is unbelievable.  If you don't have a cutting mat and you use a hobby knife you must have a cutting mat!!!!  


This shows the second floor setting in place on top of the first floor.


I didn't take pictures of the assembly of the tower room either but it too is simple.  Here the second floor roof and tower are in place.


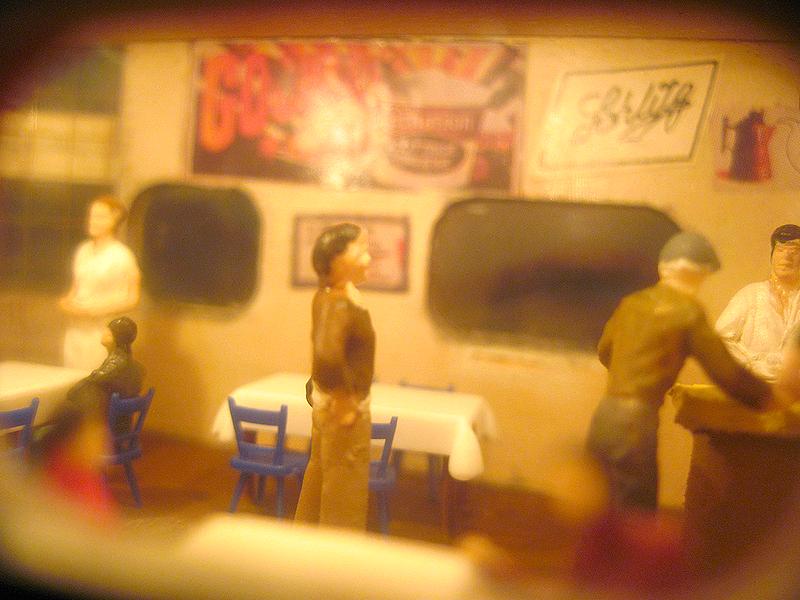
This shows the lights glued in place with my favorite glue GOOP.  There are nine 12 volt 40ma 4mm interior lights, one for each room.  A front porch light will be added when the porch is in place as well as a light over the rear door.

At this point the instructions said paint was next.  I chose Doug's favorite colors, Light gray with a darker gray for the trim.  The light gray is Folk Art #708 Dove Gray, the trim is Accent #2400 Soft Gray.


The Grandt Line windows and doors are nicely detailed and look very good on the house.

The Accent Dove Gray is a perfect match for the Grandt Line accessories.


The door is Creamcoat #2053 Dark Brown and the gold trim is DecoArt #DCA05 Antique Gold.

To be continued in Part 3


Posted by Picasa

September 12 Doug's New House Part 1

This post is about a new house I built for my son, it will be on my layout above Doug's Diner.  This will be the highest house on my layout, I have two buildings higher but not lived in. The highest is my Fire Lookout Tower the other is my Radio Communications Repeater Building and Tower.

Doug died in 2001 at the young age of 38 and I have included his Diner and now his home on my layout in his memory, he was a great son.

The kit is from Classic Miniatures, it is their Leadville House.  Doug would have loved this home.  It is a very good kit with Classic Miniature's quality building material.  It is definitely not for a beginner as the instructions leave a lot to be desired.  In my 50 plus year model railroading career this was the most difficult kit to build I ever encountered because of the lack of text instructions.  The dormers in particular are very difficult, I could not get them to fit together correctly. There is only one sheet of instructions with very good actual size drawings that can be used as templates.  All of the card stock has very accurate print for cutting out the parts for building the roofs and dormers.  The basswood components are of the highest quality as are the detail parts.

My problem with the dormers was a simple fix but were not correct according to the drawings.  The roof angle printed on the card stock did not match the roof after assembly.  Anyone could "make them fit" but I guess I expected better.

The CM Queen Ester Mine House Kit material and instructions were perfect. 

Both kits used Grandt Line plastic detail parts of the highest quality.  The only thing that could have been better would have to included an extra small detail part or two.  In my old age I will sometimes ding very small delicate parts and CM includes the exact amount so there is no room for error.


The picture above is what came in the box.

This shows the three cardboard sheets with printed roof and floor sections to be cut out with a sharp hobby knife as well as the detailing parts.

The picture above is side one of the only instructions that came with the kit.

This is side two of the instructions.  What you see is all you get.


This is the wall sections template.  The walls are made from 1/32" basswood lapped siding. 

The following pictures are progressive construction of the walls as they are glued in place to the cardboard floor.  As you can see everything is plainly marked for easy gluing.  I use Aleene's wood glue on all my craftsman kits.  It has a long snout, very strong, sets up quickly, sandable and stainable.  It's only drawback is it doesn't dry clear, it has a slightly orange tint after it is dry when it has been applied very thin.  As you can see where I left it thick it is orange.


The pictures below show room dividers for my lighting plan.  This house will have individual light control in every room.  The room dividers will prevent light leakage room to room.

I will run a 14 conductor ribbon cable from the house to a 14 position DIP switch for full light control.  The switch will be hidden in brush cover located near the edge of the layout behind the house.

My son Doug was full of energy, had a good sense of humor and enjoyed being a prankster I am adding some special effects to his house.  That requires the special lighting.


To be continued in Part 2 soon


August 22. 2012 My converted Craftsman Kit house to a Short Order Cafe

I added a significant change to the placement of this project on my layout to the end of this post on September 10th 

I bought a few Craftsman Kits over a period of time in the early to mid 1990s.  I assembled a #57 Campbell Railroad Station Kit early on, the rest have been on the shelf until a rainy day.  Well it seldom rains in Bakersfield so I finally decided to do it to it even without the rain.

As described in my July 27th post I started with my Campbell Silver Spur Mine, it isn't finished yet but it's very close.  I'm on hold with it waiting for some parts to animate the wench cable operation.  While I'm waiting I started a Classic Miniatures Kit, the Queen Ester Mine House.

It won't be used as a mine house though, I modified it to be a Short Order Cafe located across the road from my Campbell Kit Railroad Station.

I did remember to take a few pictures fairly early in to the project and a lot during the construction.


This is the template sheet from the kit.  I has full size templates for cutting all of the detail pressed clapboard and porch decking basswood. 

I moved pretty fast during construction of the basic building as you can see in the picture above.  The building is assembled and has some of my scratch built cafe equipment installed.  I used FolkArt Oak Acrylic Crafters Stain on the walls and tinted the Oak with FolkArt Walnut Stain at 15 drops of Oak to 1 drop of Walnut.
The counter and table tops are 1/16" basswood, the table supports are round tooth picks cut to 9/32" long.  The counter base is 13/32" high by  ¼" wide and 2¼" long balsa, that comes out to be 40" high by 30" deep and 16½ feet long.

The figures are not glued in place, I super glue my figures to .024" diameter #21 straight pins to paint them and then drill .025" with a #72 drill bit where I want to place the figure.  If depth isn't a factor then I leave the pin full length otherwise I cut it.

The figures in this building have the mounting pins cut off to ¼" because the floor depth is 5/16".

As you can see it's coming along nicely.  This kit is definitely not for the beginner.  It's relatively easy until you get to the wall alignment stage. 

This shows the card stock roof with the shingle alignment lines.  The shingles are made from 3/16" wide heavy brown paper and comes in a long roll.  The shingles have glue on the back of them.
This picture shows the under side of the roof with 2mm 12 volt lamps glued in place with Goop.  I will run a pair of bare #24 wire around the roof to connect the lights to the power connector rods.

The next several pictures show the roof setting on the walls and the final check before gluing it in place.


14

The picture below shows the Cafe with customers.  All the tables and seating are in place with customers waiting on food.

There is a problem, there's no kitchen yet.
I made the bench seats from a combination of balsa and basswood.  I found the ideal counter stool, a sewing pin with the round plastic ball on the end.  I used my Dremel tool with a sanding wheel to make it a half ball on a pin.  The bright colors help as a stool seat and the pin it's self looks like a chrome pipe.  

The customers are unpainted Preiser figures that I spent hours painting with Crafters Acrylics. 

In the picture above food and drink have been served, the food is painted the drinks are 1/16" piece of #24 telephone frame wire.  I stripped 1/16" of insulation off of a ⅛" piece of single conductor wire leaving 1/16" with insulation (glass or can) above the table/counter top and a 1/16" in a .02" hole in the table/counter top to hold it in place.

This close up shows the details of the beverage containers and food.

This kit has very good detail parts, one being the wrought iron ornamental Corbel porch roof brackets.

The picture above shows a post with a Corbel bracket.


In the picture above you can see some of the super details in this kit.  Note the fine detail of the patterned basswood, shingles, architectural wrought iron corbels and railing.  

In the pictures above and below some of the shingle strips have been glued in place.

The Classic Miniatures Instructions say to use a wet sponge to wet the glue on the back of the shingles, Campbell Kits say the same but that's a disaster.  The card stock roof will become too wet and warp badly, I found out that the hard way building my Campbell Station.  I now use Aleene's Wood glue with great results, it's much faster not near a messy and no warping.   

My Cafe is finished and the following pictures show the results of my venture.


I had a short piece of railing left so I tweaked it to make a hand rail up the front stairs. 

This is the finished building, customers are happy, the lights and animated sign work as planned.

The finishing touch is the Micro-Structures animated neon sign.  My Short Order Cafe is ready to be set in place on my layout across the road from my Railroad Station.

UP DATE ON MY SHORT ORDER CAFE

It's well into September now and I've made some changes to the above post on my layout.

The Cafe didn't fit in to the area across the road from my passenger station so I decided to swap places with an older building.  The Babe's Diner kit was changed to Doug's Diner after my son died in 2001 and it has been residing at the "Top of the Mountain" on my layout.  

The old diner looks much better across the road from my station than the house cafe version so I did the swap.  Doug got the new building for his Diner and Susie is getting a completely remodeled Babe's Diner as her Cafe.  My daughter Susan died in 1991 a week before her 21st birthday in a robbery.

This is Susie's new cafe.


There are two Micro Structure Animated Neon Cafe signs on the roof, one facing to the front and one facing to the rear.


When I first assembled the Babe's Diner in the mid 90s I used 1½ volt micro lights for illumination and during this upgrade I removed them and installed 12 volt 40ma 4mm diameter bulbs.  They put out about four times more light and really helped to see what's going on inside.

That's Susie next to the end of the counter.


I over hauled the entire interior, the table and chairs are no longer hand made.  They are Preiser #17219, I cut out a section from the center of the long tables to come up with the short ones.  The figures were mostly unpainted Preiser that I painted, a few are just miscellaneous 1:87 scale.

I think that my daughter would have really liked her new Cafe.

Coming soon______ Doug's new house!


It's almost finished
Posted by Picasa