
Scroll down for the Updates
My large removable section turned out so good I have decided to overhaul another section. This is a before picture of the existing module of the local Southern Pacific Superintendent's house and swimming pool.

I plan on using another scratch built Sears Catalog Home for the Superintendent's house and give the Walthers Cornerstone houses to my Grandson. I also need to either redo the pool or make a new one, the Woodland Scenics Realistic Water shrunk and it has lost over 50% of it's depth since December 2009. I'll try to patch the pool first, the Realistic Water is self-healing. I'm also going to reduce the quantity of figures at the pool party.

This picture shows the large module in place and the Mel's Destruction Crew damage where the new project will go. I will build a new frame for the project from a combination of plywood and pine boards. The new module will be much larger than the existing one as well as removable.

This is a picture showing the additional work needed to fill in the seam around the large section. After the new project is finished I'll replace the rock frontage along the track to match the existing layout rocks and blend all the seams.
In the past I've always used Plaster of Paris for my rock castings. I have been very happy with the results using Woodland Scenics Liquid Pigments to stain the rocks. Over the years the Plaster of Paris has cracked from heat related expansion and contraction. As I remodel this section I'm going to use Hydrocal for it's higher strength. This will be a new experience as it will be my first time using Hydrocal.
August 30 Update

The picture above is my basic frame for the Super's House and Swimming Pool. I used ½" OSB for the basic support structure. I used Elmer's Carpenter Glue with # 8 x 1½" wood screws for the construction.
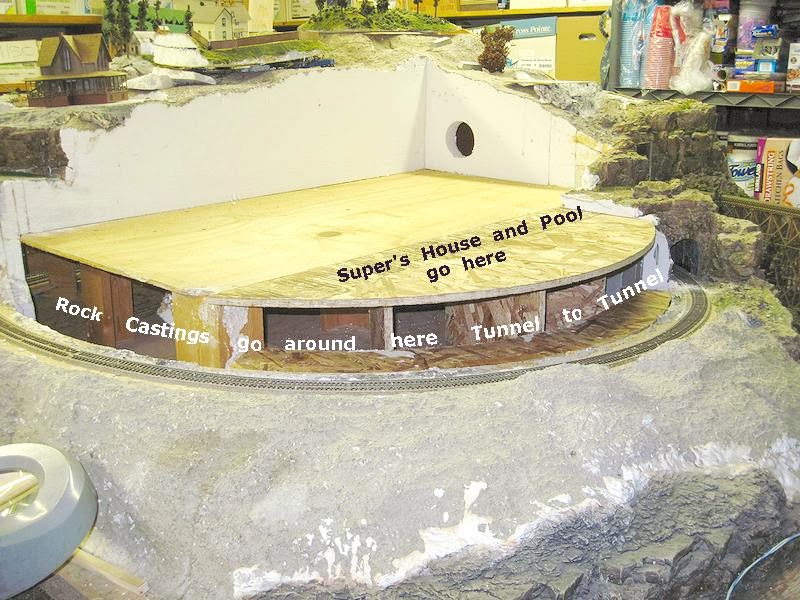
The picture above shows the completed frame in place, I will build the Super's house and pool on a like piece of curved OSB so that it is easily removeable.

This is my first attempt at casting with Hydrocal. If you haven't used Hydrocal make sure you follow the manufacturers mixing instructions, that's very important!.

As you can see the rocks turned out perfect.


This is my first attempt at casting with Hydrocal. If you haven't used Hydrocal make sure you follow the manufacturers mixing instructions, that's very important!.

As you can see the rocks turned out perfect.

This picture shows the fine detail of this casting. I used a Woodland Scenics Strata Stone #C1239 Rock Mold for this casting. I'm going to alternate between Strata Stone #1239, Base Rock #C1243 and Facet Rock #1241 to make the Sheer Rock Cut along my track between tunnels. The total length of the cut is 82" between tunnels on a 32" radius. The cut varies between 4" to 7" in height, my estimate is roughly 20 rock castings cut and flip flopped to hide the similarity of using only 3 rock molds.
September 7th Update

This is the finished frame, here it's ready for the rock castings.

Because this is my first attempt at using Hydrocal as mortar things are going slowly. Here I have two rows two castings high.

September 7th Update

This is the finished frame, here it's ready for the rock castings.

Because this is my first attempt at using Hydrocal as mortar things are going slowly. Here I have two rows two castings high.

Despite the Hydrocal learning curve it's going rather good, this is the end of day two. In this picture there are two rows of 6 castings. I used a small plastic butter cup (visible under the frame) to mix the Hydrocal mortar in small batches. After the Hydrocal has fully dried I'll cut the right end flush with the frame.
I will add at this point that carving Hydrocal isn't easy after it's dry. There is a short window of about 5 minutes after the mortar is applied to carve a rock look into the mortar so using very small batches works the best.
When the rocks are fully dry they will be ready for staining, while I'm waiting for the Hydrocal to dry I'm going to work on the top edge of the frame, I'm going to use Paper Mache to fill between the Hydrocal and the removable module that will sit on top of the frame.
September 16th Update
This Update is the last Post of my Frame Project Series. The the following pictures show the completion of the frame and rock assembly that will hold my swimming pool module.

The Hydrocal rock castings are finished and "glued in place with Hydrocal" on the frame.

The picture above shows the finished rock castings and the Hydrocal touch up above and below the castings ready for staining. I have placed the swimming pool module base on top of the frame and used plastic Saran Wrap to prevent the matching Paper Mache from sticking to the rock castings.

This picture shows the rock castings stained and in place on my layout. It will still take quite a bit of finishing work to mate the new rocks to my layout.
This completes this post on the construction of the frame and rock cut for the lower loop of my helix. The next series of posts will be the construction of the Yard Super's house and swimming pool.
